Tuesday, August 6, 2013

The Camera That's Always With You

Colorado River in Marble Canyon - an iPhone 4s photo ~ © Royce Bair (click to enlarge)
There's a lot to be said about "The Camera That's Always With You," like my iPhone 4s. Although it does not have a zoom lens, it is incredibly sharp. It's 8MP files rival those from a expense DSLR camera I purchased a few years ago. A 16"x20" print I recently made for a client, from the above file, amazed both of us.

Now is often better than later. I shot this photo and the one below, using the ProHDR app, which allows you to take two different exposures and blend them into one photo that has a higher dynamic range than the originals. Impressed with these photos, I walked back to my car, got out my Canon EOS 5D Mark III with a 24-70mm zoom lens (a $5K package), and took several similar images using the camera's built-in HDR firmware. The results were nice, but because the light was quickly changing, these later images just didn't have the same unique shadows and glow that were in my iPhone photos.

A vertical view of Marble Canyon - taken with my iPhone 4s ~ © Royce Bair
(click to enlarge)
Lesson and motto. There's a lesson in this story that has been repeated many times in my life: Having any camera, always with you, and constantly using it, will always produce better photos than the one that is packed in the trunk or safely at home. This reminds me of Chase Jarvis' motto, "The Best Camera is the One That is Always With You," — a precept that has became a best-selling app and book.

Income from little cameras. It's not surprising that over the last few years I've had many of my iPhone photos published in magazines, even some of my early 3s images, with only 3MP. (There is now a stock photo agency that actually prefers cellphone and pocket camera images—offering a higher sales commission than images produced by regular cameras!)

Other small camera options. Nokia is introducing later this year their Nokia Lumia 1020 smartphone with a 41-megapixel camera. Using a Carl Zeiss lens and a much larger image sensor (0.42 inch diagonally vs. iPhone's 0.22 inch), the resulting images are said to be ultra-sharp, even in low light.

Much press has been given lately about the compact mirrorless cameras that are replacing some photographer's DSLR cameras because they have large, high-quality image sensors (many are APS-C size) that over six times larger (in total area) than even the new Nokia smartphone camera. I recently purchased an Canon EOS M to keep in my car, even when I am not on assignment. However, the iPhone's camera will still aways be in my pocket!


Wednesday, September 19, 2012

Phil Koch's 'Horizons' Wins by Breaking the Rules


Click above image to see 17 other 'Horizon' photos by Phil Koch.
Can a photographer create his own style and following by breaking one of the basic rules of composition? Phil Koch did.

On Flickr, you can curate galleries of images that feature the work of other photographers you like. There are three unique things about my new Flickr gallery of Phil Koch images: 1) every image was photographed by Phil in Wisconsin, 2) every image is a vertical, and 3) every image has the horizon line almost dead center -- breaking a major rule of composition. Because of Phil's unique composition, he has created a style that is starting to get attention.

"A little over a year ago I bought the Canon 7D with a standard lens," said Phil in a recent interview. "I bought the camera for film [video] making but started shooting rather boring landscapes. I always wanted to try to shoot a good vertical landscape because I have noticed very few do that. So my goal, a little over a year ago now, was to take one good vertical a day, forcing myself to really look at both the sky and what was on the ground in front of me. I call them vertical "Horizons" because I split the photo in half. So many people think I am breaking the basic rule of photography doing this, but if you stand in a field and look at the world in front of you the horizon is always dead center of vision no matter how tall you are. Now blow this image up to say a 20x26 and its as if you are there and can walk into the photo."

Although Koch has only sold a handful of prints so far from the 'Horizons' project, its exposure has resulted in a new assignment to start traveling the country to shoot both photography and video. You can see more of Phil's 'Horizons' work at MyHorizonArt.com
(Originally published on August 29, 2011.)

Friday, June 22, 2012

My Favorite Lenses for Night Photography

Canon EF 24mm f/1.4 L II USM

During my film days, my favorite landscape lens was a 24mm f/2.8 prime lens. Those who are familiar with my recent NightScape work know that in order to maintain the stars as points of light, you need a fast lens in conjunction with high ISO's, so that you can maintain exposures that are less than 30 seconds --otherwise you blur the stars (producing star trails). I rarely stop down to greater than f/3.5, and prefer f/2.8 where possible, which is wide-open for most prime lenses, and the better zoom lenses.

The problem with shooting a lens wide open is that stars can really show off the faults or aberrations of a lens, especially coma. Comatic aberration causes point sources, such as stars, to appear distorted --appearing to have a tail (coma) like a comet. These coma "tails" are most apparent near the edges of a photo. The good news, is that 50% of the distortion goes away when a well-designed lens is stopped down by one stop, and about 80% goes away by two stops. Unfortunately, with my night photography, I can't afford the light loss that comes with stopping down from f/2.8 to f/4.0 or f/5.6!

This is the reason I purchased the Canon 24mm f/1.4 lens. As you can see from my own tests on point sources of light, this lens is fairly well-corrected by f/2.8 (click on any image for a larger view):


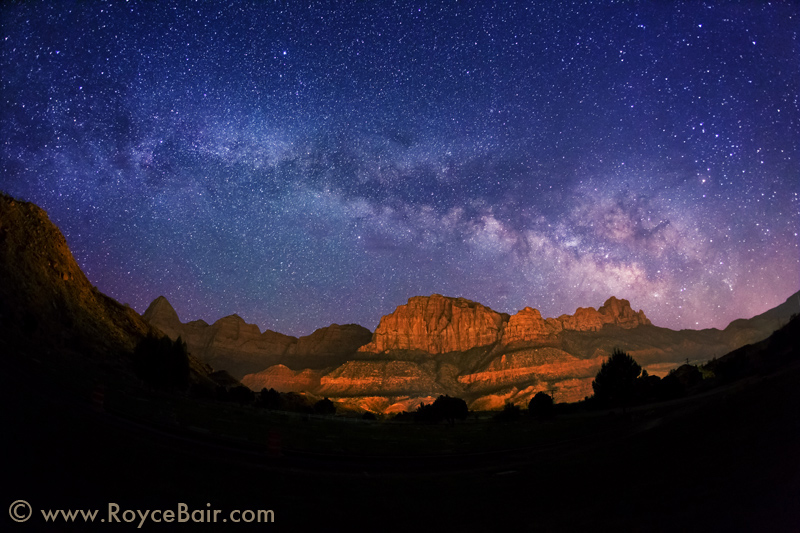
And, if I get in a pinch, and need more light, it produces acceptable results at f/2.0. But the real beauty of this lens is the bright image it gives you in the viewfinder. You can imagine that composing in near pitch black is made so much easier with this brilliant, f/1.4 lens! Here's a recent Milky Way photo I took with it in Zion National Park at 4:00 in the morning. The amber glow on The Watchman is coming from the lights of Springdale city! Technical info: Canon EOS 5D Mark III, using the Canon EF 24mm F/1.4L II lens @ F/2.8, 15 seconds, ISO 8000 (click on any image for a larger view):


Although this lens is designed for full-frame sensors, I find a lot of use for it as a candid portrait lens on APS-C size sensor cameras, i.e. my Canon 7D. On these smaller sensors, the lens performs similar to a 35mm lens (going from an 84º angle of view to about 63º). Shooting wide open is awesome! You focus on the eyes of an active child, and the back of their head is already out of focus, with the background an un-distracting blur. This same thing applies to close-up nature photography, like these blue flax wildflowers I photographed at f/2.8:


Canon EF 15mm f/2.8 Fisheye

This fisheye lens is my favorite night photography lens because it allows me to include more than twice the sky as my 24mm lens (180º vs. 84º), and because it's really two lenses in one. Although the heavy barrel distortion from this 15mm fisheye lens creates a special effect that is liked by most people, I can remove that distortion with software if I choose, giving me a view somewhat similar to Canon's EF 14mm f/2.8L II USM lens, which has a fairly undistorted 114º angle of view. Here's an example of what I mean. Below, is another shot of The Watchman and the Milky Way, taken from the foothills west of Springdale, Utah at 2:00 in the morning (light pollution from the city is lighting The Watchman). This is 15mm fisheye view without any distortion correction. Technical info: Canon EOS 5D Mark III camera, using the Canon EF 15mm F/2.8 Fisheye lens @ F/3.5, 30 seconds, ISO 6400.


In the next image, I left the barrel distortion alone on the left side, but did a partial correction on the right side using Photoshop's "Edit > Transform > Warp" function:


Although a more complete distortion correction could have been accomplished with software, i.e. DxO Labs, I've found this is not always as aesthetically pleasing as being more selective via Photoshop. I should point out that this lens has fairly acceptable coma at its wide-open aperture of F/2.8; it about 65% corrected at F/3.5, and it is about 75% corrected at F/4.0.

Un-warping your own images: Would you be interested in learning how to "un-warp" your own images? Images from any lens can benefit from de-warping, not just fisheyes. Take this quick poll (your anonymous answers will determine whether I add this topic to a future blog or newsletter).

For other tips and tutorials, you can subscribe to my newsletter.

Monday, April 2, 2012

NightScapes - Landscapes and the Milky Way stars


This is my latest NightScapes video. This style of night photography showcases starry night skies with landscape features, many enhanced with light painting. Here is a before and after:

All of my starry NightScapes are done in one shot. I include light painting when I think it helps in the recognition of the landscape. My stationary key light is almost always off-camera, several hundred feet away, as was the 2-million candlepower halogen I used in this photo. I added a moving, orange filtered, 1-million candlepower spotlight from the camera position to help separate the right fin of the arch from the background. All light painting is done during the single time exposure. This exposure was with the Canon EOS 5D Mark II, with the Canon EF 15mm f/2.8 Fisheye Lens @ f3.5 for 30 seconds, ISO 6400.

Background and NightScape History: When I was 17, my father took me on a backpacking trip to the Eagle Cap Wilderness in northeastern Oregon. He let me borrow his 1950′s, all-manual, Argus C3 35mm camera. When the Kodachrome slides came back, I was hooked on landscape photography! By chance, I had taken a few photos early in the morning and late in the afternoon, and noticed that the angular light was much more interesting than the light of midday. When I became a professional photographer, over 30 years ago, I started doing NightScape photography as a way to give me greater lighting control over my landscapes. I was also trying to prove to my commercial clients that if I could light up places like Rainbow Bridge with battery-powered lights, I could handle their industrial location assignments with ease. It worked, and a year later, I also received an 8-page spread in American Photo magazine. Since then, many have copied my style. In those days, I did long, 10-minute exposures with star trails in the sky. Now, I do shorter time exposures (under 30 seconds) that include only points of light, i.e. star constellations and the Milky Way. Unfortunately, I now have less time to fire off all my lights, so more planning and greater synchronization is required!

Technical Stuff and Links to More Info: Most of my "NightScapes" expose the night stars and constellations as points of light, rather than as blurred star trails. This requires short time exposures of under 30 seconds. Because daylight is 40 million times brighter than starlight, I prefer full-frame sensor cameras that produce lower noise when using high ISO’s. I provide more technical information here. My NightScape Story offers more behind-the-scenes background information. You can see more of my NightScapes and order prints here.

Thursday, January 19, 2012

Teenage Barrel Racing Champion - Chevy Assignment


Recently, Chevrolet asked be to complete a photo set for their latest website RoadWereOn.Chevrolet.Com. Take a look! This year is Chevrolet's 100th anniversary.


I had a great time photographing 15-year old MacKenzie and her dad, Karl, who use their family's Chevy 2500 pickup truck to haul MacKenzie's horse, Wrangler, to an equestrian park nearly every week so she can practice for her rodeo competition in pole bending, barrel racing, and goat tying. I hope you'll take a look at the complete series on the Chevy site.

Chevrolet asked several regional photographers around the country to give their photo interpretation of how people use their Chevy's in real life. It was a fun gig. (Tweet #Chevy100 to see how other photographers interpreted their assignment). One of my favorites was "Girl's Day Out" by a photographer named "Rania".

How can I get cool photo assignments like this? Everyone of these photographers, myself included, appear to be active in social media: In most cases they had a Flickr account, a Facebook account, a Twitter account, and a blog -- and they are active in most of these areas. This is how photographers get seen in today's marketplace. (There are plenty of other photographers who are more talented than I am, but you can't find them when the job needs to be done ;-)

You can also view my "Most Interesting" images on Flickr to see more of "My Vision".

Thursday, January 12, 2012

MoonScapes - Photographing a full moon with an evening landscape


Here's a photo I took earlier this week: a big yellow moon as it passes through a cloud, surrounded by a cold, blue winter sky. Only five minutes later the same full moon begins to set behind the Oquirrh Mountains, near Salt Lake City, Utah.


My "Nightscape" Moon Photography Tips: If you want to record good detail in the clouds and landscape near the moon, you need to know two important re-occurring facts: 1. The night before the full moon, the sun sets just as the moon is rising; and 2. the morning of the full moon, the moon sets just as the sun is starting to rise. During these two periods, there is just enough ambient light from the setting and rising sun to give detail to the surrounding landscape -- otherwise, it is too dark, and the contrast range is too great to record anything but blackness around the moon -- like you see in these two photos:

You can't have it both ways: either you get a washed out (overexposed moon) in order to see the clouds and surrounding landscape detail -- or you get a correctly exposed moon, and lose all the surrounding detail -- that is, unless you follow these "Nightscape" tips.

Moon Charts: I use the Old Farmer's Almanac moon phase, rise, and set charts to plan my shoots. (All times are based on sea level, so they must be adjusted slightly for mountainous terrain -- the moon will set sooner because of mountains, and the sunrise will be delayed because of mountains, and etc.) Using these charts, I can often get at least one moon rise and one moon set per month (weather permitting) that allow for good, full moon photography.

An example of how I did it: Based on my Zip Code, the full moon was to take place on January 9, 2012 at 12:32 AM. The sun was suppose to rise on this day at 7:51 AM, and the moon was scheduled to set at 7:54 AM. Because the eastern mountains around Salt Lake City are about 6,000 feet higher than the valley floor, I figured (by experience) the sunrise would be delayed about 30 minutes. And because the western mountains are about 3,000 feet higher than the valley floor, I estimated the moon would set about 15 minutes early. I figured right on both accounts. This photo was taken at 7:30 AM, with just enough predawn twilight behind me to add detail to the western sky (change it from black to a dark blue) and western mountains.

Mirror Lock-up. One other important thing: Even with a sturdy tripod and a remote release, the vibration from your mirror going up just before your shutter release can blur or degrade your shot. That's because the magnifications are so great (12X in this shot) and the shutter speeds are so slow (about 1/4 second in this case). Read your manual on how to do this for your camera. Once it is set through your menu, the first press of the shutter release will lock up the mirror, and the second press will release the shutter, and return the mirror. Even with a remote release, you should wait about three seconds for the vibrations to dampen before pressing the release the second time. So many things to remember! I also find I have to manually focus, and set all my exposures manually for best results. (For super accurate focus, I switch to Live View through my LCD screen, and magnify it to 10X. Once set, I switch back to regular view to conserve battery power.)

Technical info on top two photos: Canon EOS 7D with EF100-400mm f/4.5-5.6L IS USM lens @ 400mm (35mm equivalent is 12X)
f8 @ 1/4 sec ISO 100

You can also view my "Most Interesting" images on Flickr to see more of "My Vision".

Monday, December 5, 2011

Using Digital Negative (DNG) to archive your raw image files


Five, 10, or even 40 years from now, will you be able to open one of the proprietary, raw image files from your digital camera? You will, if you have converted your raw camera files to DNG (.dng).

Why shoot in raw? Raw image files are sometimes called digital negatives, as they fulfill the same role as negatives in film photography: that is, the negative is not directly usable as an image, but has all of the information needed to create an image. Like a photographic negative, a raw digital image will usually have a wider dynamic range (16-bits per color channel) and color gamut than the eventual final image format (usually a JPEG, or .JPG, which is an 8-bit image). The purpose of raw image formats is to save, with minimum loss of information, data obtained from the camera's sensor. Here are three examples (one, two, three) of why you should be saving your camera's raw image format file -- if you aren't already.

Reading the raw file. Nearly every time I have purchased a new digital camera, I have had to purchase the latest version of Photoshop, or a new raw converter plug-in in order to read and open the new raw image files produced by that camera. Examples of proprietary raw image file format extensions are .CR2 (Canon), .NEF (Nikon), .ORF (Olympus), .PEF (Pentax), and .RW2 (Panasonic).

Free raw file converter. A year after I purchased my last DSLR, I could not open the raw camera files with my current version of Photoshop. I was not ready to upgrade to Photoshop CS5 (and pay another $200), because I had just done that the year before, when I upgraded from CS3 to CS4. A friend suggested that I get Adobe's free DNG Converter, and convert all my new camera raw files to the universal DNG format, which is supported by all the versions of Photoshop (back to the original CS), Elements (back to version 3), and Lightroom.

Reduced file size. Not only is the free Adobe Digital Negative Converter fast in its conversion, but it typically reduces the file size of my Canon ".CR2" files by 20% when they are converted over to the ".dng" format. I am now, systematically, taking all my old CR2 files, converting them to DNG, and throwing away the old CR2 versions.

Archival peace of mind. The best reason to convert your camera raw files to the universal DNG format is long-term compatibility. Because cameras can use many different raw formats -- the specifications for which are not publicly available -- this means that not every raw file can be read by a variety of software applications. As a result, the use of these proprietary raw files as a long-term archival solution carries risk.

DNG is an open raw image format owned by Adobe. DNG is based on the TIFF/EP standard format. Exploitation of the file format is royalty free. It was launched in 2004 after requests by many photographers and photo trade associations (i.e. the American Society of Media Photographers, or ASMP) that there be a universal raw format standard. The US Library of Congress recommends DNG as the preferred alternative to other "less desirable" raw image formats. In their "Digital Photography Best Practices and Workflow" (dpBestflow) project, ASMP (funded by the US Library of Congress) stated that "DNG files have proven to be significantly more useful than the proprietary raw files in our workflow." With this kind of support and recommendation, we should expect the DNG format to be around for a long, long time!

You are invited to see my "Most Interesting" images on Flickr (based on popularity stats).