Showing posts with label workshop. Show all posts

Monday, December 6, 2010

Blue Hawaii - Changing moods with RAW files

Photographing in RAW can give you many future options for changing the mood of your photos, allowing you to create new markets for your prints. If you're not shooting in RAW, you're missing half the fun, and throwing away your DNG (Digital Negative)!

Changing day to night. This romantic evening view of a tropical beach was originally a daytime photo. I photographed these silhouetted palm trees almost seven years ago when I was in Hawaii. This idyllic beach is on Maui, near a great restaurant along the north shore (Hwy 36, in Paia) called 'Mama's Fish House'. I am glad that even in those early digital days, I had the good sense to set my camera's menu to capture the image in RAW as well as in the typical JPEG (.jpg) mode.

Yes, shooting in RAW produces larger files, that fill up your memory cards quicker. However, the end results can often save your neck or give you more options later on. That's because a RAW file is a digital negative that contains much more information than a regular JPG file. Today's RAW files typically contain 16-bits of information per color channel (48-bit RGB) vs. the 8-bits found in JPG files. This extra information can often salvage an over or underexposed image or allow dramatic color changes without producing ugly noise or banding problems.

How I did it: The image on the left is the daytime original. The "evening" image on the right was created by taking the RAW file and sliding the color temperature from daylight (5000 degrees Kelvin) to a cool 2000 degrees within Photoshop's Camera Raw plug-in. That's it! (Click on images for a larger view.)


View my most interesting Flickr images on Flickriver.

Monday, September 7, 2009

Chinese Silk Industry - My Vision


In March/April 2008 I traveled to China with a group of U.S. business owners. We were given access into selected Chinese industries. It was interesting to note that in some of China's ancient art craft industries, i.e. this silk rug factory, much of the work that could be mechanized is still done by hand, simply because their most abundant resource are "people".

It's important to be able to tell a story with your images so that magazines will be able to use as many images as possible (see other images in this series) I've tried to show silk rug making from raw silk cocoons to finished rugs. The silkworm caterpillar spins about 1 mile of filament to make a single cocoon. It does this in a 2 to 3 day period. The silk farmers then kill most caterpillars by heat, leaving some to metamorphose into moths to breed the next generation of caterpillars.


Below, are skeins of dyed silk thread in various colors at a silk rug factory in Shanghai, China.


Here were some of the silk rugs on display and for sale in Shanghai. I asked an American tourist to stand in this picture to give a size relationship to the rugs and to appear as a potential customer. Be sure to click on the images for a larger view, as the detail of the designs are exquisite!


You can also view my Flickr Photostream to see more of "My Vision."

Monday, August 24, 2009

Expressive Little Girl - My Vision


Last Saturday I went to a neighborhood picnic where some of the teenage girls were offering free face painting to the younger children -- can you say, "Photo Op?!". (See my "photostream" to view eight other images in this series.)

After having her face painted, this little girl made a funny face to her friend who was standing nearby.

Almost missed it... I nearly lost this shot because I didn't have my camera set to my standard default settings -- which is to keep my camera on Aperture Priority, and my lens set for the widest aperture.

Establishing a default setting: I also keep my ISO at 640 and my white balance on "Average" (my image file is always set for Camera RAW, with a Large JPEG for rapid reviews). With this setting, I'm ready for most action situations that I come upon. By using Aperture Priority, with the the camera/lens set to widest possible aperture, the camera will automatically give me the fastest shutter speed for that aperture and ISO. (I realize that "640" is a pretty high default ISO, but its one that gives me "controllable" noise with this camera, and enough speed to handle most surprise and unplanned situations.)

With people shots, you rarely need a lot of depth of field. In fact, shallow focus is most often preferred. But what you do want is a fast shutter speed to stop action and camera shake (even if you have image stabilization). Except with landscapes, architecture, and other "tripod" type shots, having a lot of depth of field is not as important as having SOMETHING tack sharp by using the fastest shutter speed possible. (Remember, you can have great DOF, but if the shutter speed is not fast enough to stop the action or freeze your camera movement, you will still have a soft and blurry image.)

I had done a landscape shot the day before where I did need a lot of depth of field. Instead of changing all my camera settings to my standard defaults before putting my camera away, I had left the F-stop at f13. If my next shot had been a still life or another landscape, this would not have been a problem. That's because these type of shots are often quite relaxed, where I have time to THINK about what I'm doing. However, when I see a candid portrait opportunity developing, I sometimes jump into it and start clicking away before the expressions flee -- like I did last Saturday with this little girl.

Luckily, even at f13, I still had a shutter speed of 1/100 of a second, and I caught her fleeting expression without any head movement. The extra depth of field in this shot created post-production problems, though. It took over 30 minutes to blur the background in Photoshop (having to create a mask around her hair), so that it was no longer distracting and competing for attention.

Another great example of using Aperture Priority and the widest aperture possible is this helicopter shot of the Chicago skyline by Trey Ratcliff. This photo was taken at the lens' widest aperture (f2.8), giving the camera an 1/8,000 second shutter speed with an ISO of 800. Here's the full resolution file on Flickr if you want to view the incredible detail of this image (yes, it's a little noisy in the shadow areas, but he GOT the image).

You are invited to see my "Most Interesting" images on Flickr (based on popularity stats).

Saturday, August 22, 2009

Piles of Money - My Vision


This iconic photo of piles and stacks of cash (US dollars and coins) has been one of my best "conceptual" stock photography sellers. (Click on the image for a larger view.)

Although it looks like a ton of money, there is only $10,000.00 dollars here in real money. (Even so, we were happy to get this much cash safely back into the bank when the shot was over!). Those are real money bags (with coins) from the Denver Mint and the Federal Reserve Bank of San Francisco. And those are real $100 bills (before the recent design change). We were able to style this shot using only 10 grand because many of the stacks of $100 bills have ones underneath. It takes a couple of hours to style a shot like this, but the stock photo revenue it produces is worth the effort.

This is my third image in this "money series".

You are invited to see my "Most Interesting" images on Flickr (based on popularity stats).

Thursday, August 20, 2009

Stack of $1000 Dollar Bills - My Vision


This is a real stack of U.S. $1,000 bills, with a little wide-angle distortion added for impact. Well, sort of...

Full Disclosure: The top bill really is genuine (and as a collector's item, is worth much more than $1000); however the bills underneath are $1 bills -- they were added just for effect. A friend lent the bill for this still life (and stood by while I photographed his little treasure). This has been a great conceptual stock photo seller.

Lighting & Post-production: The stack was lighted by one large (48"x48") softbox strobe, about three feet from the pile of money. The white seamless paper worked as its own reflector "fill" for the soft shadow effect. (This type of product lighting allows graphic designers to easily "float" the image anywhere on a page. In post-production, you have the responsibility to select any of the not-so-white background and clip it to pure white within Photoshop's "Levels" -- being careful to feather the selection around the shadow area.)

Interesting tidbits: The $1000 bill featured a portrait of Grover Cleveland from 1928 to 1946. Today, the U.S. Treasury Department no longer prints large denominations. In 1929, a $1,000 bill would have been equal to $12,440.55 in our current purchasing power!

(Click on the image for a larger view.)

You are invited to see my "Most Interesting" images on Flickr (based on popularity stats).

Saturday, August 15, 2009

Cattle Grazing in Lush Pasture - My Vision


These are Black Angus beef cattle grazing in a pasture near Afton, Wyoming (USA).

Bigger is not always better - a composition tip for increasing your stock photo sales: You'll note that this image has a lot of blank space, making the main subject, the cattle, smaller. This is not only a composition choice (following the "rule of thirds"), but I have found over the years that many of my stock photos sell much better if they have space for designers to place type or other photos. By giving the designer this option, I often see my images published as the main photo in a story rather than being used as one of the smaller, accent or filler images. And if you'd like to see your images reproduced full-page, don't forget to shoot the same scene vertically as well as horizontal (see below).

The larger your images are reproduced, the more money you'll make (that's when bigger IS better). It don't matter whether you're licensing your images under a rights-managed model, royalty-free, or as microstock, larger uses make you more money. At many microstock agencies, the prices for "large" or XLarge download sizes are three to six times greater than those for "small" or medium downloads!


Another stock photo tip: if you'll looking for additional ways to increase your sales, read this short article I wrote about shooting on "spec".

You can also view my Flickr Photostream to see more of "My Vision."

Thursday, August 13, 2009

Coy Little Kitten in Tall Grass - My Early Vision


A coy little kitten poses under a clump of tall Cat Tail Grass. This photo was my first ever attempt at "serious" photography. Let me explain... (Click on the image for a slightly larger view.)

A Walk Down Memory Lane: I came across this photo yesterday, and decided to publish it on my blog. I took this picture when I was 17 years old -- that was 43 years ago, in the summer of 1966. The kitten was a little barn-yard friend who followed me around during my milking chores on the family farm.

I had been in love with photography for a little over a year, and I had read every book my small town library had on the subject. I came across an article in an old Popular Photography magazine (given to me by a high school teacher) about how to improve your outdoor photos with light reflectors made from crumpled aluminum foil, flattened and wrapped around a sheet of corrugated cardboard. I had to try it out!

I transplanted the grass onto a table I made so that it would be easier to photograph my subject (hey, that also makes this my first attempt at "table-top" photography ;-). I used my father's old Argus C3 35mm rangefinder camera and a roll of Kodachrome film*. I rotated the table so that the late afternoon sun was back-lighting the grass and my kitten, and then illuminated him from the light of my homemade reflector (placed between the kitten and the camera, and slightly to the left).

My little kitten friend was a real sweetheart that played well to the camera, don't you agree?

BTW, some call this foxtail grass, but my neighbor calls it "cat tail grass" -- wouldn't that be a coincidence!

*I only took two or three shots on that roll, so it was a couple of months before I finished the roll and could afford to have it processed, in order to found out if I had been successful.

You can also view my Flickr Photostream to see more of "My Vision."

Monday, August 10, 2009

Hand Protecting a Young Plant - My Vision


I could have title this post, "How to breath new life into old photos". This was originally a black and white photograph, taken several years ago in the studio, on 4x5 B/W sheet film. I asked my next-door neighbor to be the hand model (cheap ;-).

I recently scanned the negative, and colorized the image in Photoshop. It has become one of my best stock photo sellers!

You can also view my Flickr Photostream to see more of "My Vision."

Saturday, August 8, 2009

Dancing Aspens - My Vision


This wide angle photo of aspen trees in a golden meadow was taken near Kamas, Utah just before sunset. The image was used to make one of my very first fine art giclee prints. (Click on the image for a larger view.)

At one time I owned the first and only commercial fine art gallery in Salt Lake City devoted solely to photography (Aperture Photo Gallery). We were one of the first photographic galleries in the country to accept giclee prints.

Photo or Giclee Prints? Although I love true photographic prints (via the wet silver halide process), I'm a firm believer that the giclee process offers greater flexibility (more substrate and surface choices), a much wider color gamut, and more archival permanence.

I also was a giclee printing consultant for many yours for Inkjetart.com. Here's an interesting interview with Mac Holbert of Nash Editions, one of earliest printers of giclees. Nash Editions prints for photographic artists i.e. Robert Farber, Milton Greene, Douglas Kirkland, Winston Smith and Charles Wolfe.)

You can also view my Flickr Photostream to see more of "My Vision."

Wednesday, August 5, 2009

Apple Orchard Harvest - My Vision


Here's an old-fashioned apple orchard harvest (Jonathan and Delicious) I photographed a few years ago around the end of September. You can see another cluster of bushel baskets in the distance. (Click on the image for a larger view.)

While through Payson, Utah a few years ago, we came across a small, family farm that raised apples (it's on the right side of the road, just before you drive up Payson Canyon). Ever since that first visit, we've tried to stop by around the last week of September.

Styling: As a former commercial photographer, I rarely photograph a shot just as I see, except when I'm doing editorial or environmental photography. My wife and I polished the top layer of apples (taking off the haze and dust) in the four or five closest baskets, in order to increase the color saturation; and I rearranged the position of the baskets slightly to make the shot more visually appealing.

A little styling BEFORE the shot will dramatically improve most photographs. I strongly believe in "fixing" problems before you start shooting, instead of trying to correct it later in Photoshop. The difference between a polished apple and an over-saturated apple in Photoshop is the difference between "appealing" and "garish".

You can also view my Flickr Photostream to see more of "My Vision."

Tuesday, August 4, 2009

Portrait of a Little Red Headed Girl - My Vision

(Click on the image for a larger view.)

Amelia has many different moods. Three other images from this portrait session show some of those interesting sides of her.

Props & backgrounds: One of my favorite props for doing portraits is an old Bentwood chair (often used in bars and restaurants between 1860 and 1930). If you'll turn the chair around backwards, and let people relax or naturally place their arms on the back of the chair -- you'll often get some interesting body positions and expressions.

The background is a hand-painted autumn forest scene that goes well with her reddish complexion and hair, don't you agree?

You can also view my Flickr Photostream to see more of "My Vision."

Monday, August 3, 2009

Dramatic Portrait of an Actor / Model - My Vision


Earlier in the week I had been photographing glassware using a portable table-top background cyclorama, similar to a Kaiser studio kit (but one I had built myself, using translucent plexiglass, and light from underneath with strobes). I asked Gerald, the model / actor, to step over to the table-top cyc, lean over and rest his arms on the table-top background. The effect was quite dramatic, and similar to what one might see in a theater production. (Click on any image for a larger view.)

This Kaiser portable table-top studio background is a small cyc (cyclorama) that you can buy for about $1300. I build one myself using a translucent white plexiglass sheet (about 3/16" thick and about 3 x 5 feet), and a 2x4" wooden frame (minus the attached lights you see in the photo below). I would then light the table from underneath using strobe lights. It was great for doing glassware photography.


Self-Learning Tip: Always look for the catch-lights in the eyes, and you can often figure out how a photographer light a subject. You could do something similar to this by using a light table, or a lightbox positioned below (and slightly camera left) and pointed upward.

Sidebar: Some time ago, a talent agency asked me to photograph some of their clients. They mainly wanted "head shots" for their talent books. Although the money they were offering to pay me wasn't that good, I saw it as an opportunity to experiment with people who were willing to try new things, and built portfolio images for both of us. Since some of these people had backgrounds in theater, they also had access to some interesting wardrobe pieces, which can really help liven a portrait. "Trading" talent has been a tool I've used over the years to increase my experience and build my photographic reputation. This image is part of a series that has resulted from these talent trades.

You can also view my Flickr Photostream to see more of "My Vision."

Thursday, July 30, 2009

Gypsy Fortune Teller - My Vision


Linda and I had a lot of fun creating this photo of the Gypsy fortune-teller with crystal ball and reading cards. Linda is my wife and the stylist for this shot. She choose all the fabrics and gathered all the props for this image, to help create the illusion of coming into a fortune-teller's shop and receiving a psychic reading.

(Click on any image for a larger view.)

The slightly blue halo emanating from the crystal ball is produced by a Nikon #1 Soft (flare) filter. This image was scanned from film, and there is virtually no Photoshop work done to this photo.

Here is the studio lighting (all strobe) set-up for the Gypsy fortune teller photo (that's Linda, sitting just to the left of where the model had been sitting):

1. Main light - a 48" x 48" soft-box (slightly below the model and pointing up to simulate the lighting coming underneath from the crystal ball.
2. Fill light - 36" x 36" soft box.
3. A projection spotlight to illuminate the eyes of the Gypsy model.
4. The crystal ball had a light coming up through a hole in the table.
5. Camera position through that narrow slit (made by two scrims that keep light from spilling onto the foreground -- the table and cards). There are three other scrims in this set-up, and they are covered with black velvet cloth.
6. Not shown, are lights behind the draped fabric backdrops, positioned to shine through the fabric.

Sidebar: Some time ago, a talent agency asked me to photograph some of their clients. They mainly wanted "head shots" for their talent books. Although the money they were offering to pay me wasn't that good, I saw it as an opportunity to experiment with people who were willing to try new things, and built portfolio images for both of us. Since some of these people had backgrounds in theater, they also had access to some interesting wardrobe pieces, which can really help liven a portrait. "Trading" talent has been a tool I've used over the years to increase my experience and build my photographic reputation. This image is part of a series that has resulted from these talent trades.

You can also view my "Most Interesting" images on Flickr to see more of "My Vision".

Wednesday, July 29, 2009

Sophisticated, Surprised Old Lady - My Vision


With a little coaching, Lois Bartel, is a great character actress. You can almost hear her say with surprise and indignation, "Why, I never heard of such nonsense!" Don't you love all the props and styling she brought to this shoot -- the spectacles, sequined dress, feathered wrap and gloves? She's a jewel.

Sidebar: Some time ago, a talent agency asked me to photograph some of their clients. They mainly wanted "head shots" for their talent books. Although the money they were offering to pay me wasn't that good, I saw it as an opportunity to experiment with people who were willing to try new things, and built portfolio images for both of us. Since some of these people had backgrounds in theater, they also had access to some interesting wardrobe pieces, which can really help liven a portrait. "Trading" talent has been a tool I've used over the years to increase my experience and build my photographic reputation. This image is part of a series that has resulted from these talent trades.

(Click on image for a larger view.)

You can also view my Flickr Photostream to see more of "My Vision."

Tuesday, July 28, 2009

Ballet Legs Perspective - My Vision


This is a wide-angle photo of a woman's legs - with her upper body disappearing from view through the principle of diminishing perspective.

Below, is the studio set-up for this image. Photography was done with a Mamiya RB67 film camera, using a 50mm wide angle lens (similar to a 24mm on a full-frame 35mm SLR camera).

(Click on any image for a larger view.)


No fancy Photoshop work was used here, just straight photography and good lighting.

Sidebar: Some time ago, a talent agency asked me to photograph some of their clients. They mainly wanted "head shots" for their talent books. Although the money they were offering to pay me wasn't that good, I saw it as an opportunity to experiment with people who were willing to try new things, and built portfolio images for both of us. Since some of these people had backgrounds in theater, they also had access to some interesting wardrobe pieces, which can really help liven a portrait. "Trading" talent has been a tool I've used over the years to increase my experience and build my photographic reputation. This image is part of a series that has resulted from these talent trades. (Debbie Cox was the model for this shot.)

You can also view my "Most Interesting" images on Flickr to see more of "My Vision".

Thursday, June 18, 2009

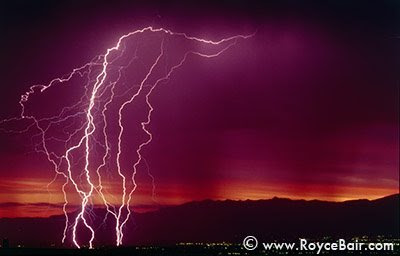
Lightning Makes A Striking Pose - My Vision

(Click on image for a larger view, or click here to see a series of four images on my Flickr photostream.)

I think lightning photographs continue to amaze people because of their awesome force, and because they are a very graphic icon of nature's power that is often used to represent power in modern technologies. And because of this relationship, I've made many stock photo sales from my lightning images.

Photographing lightning is relatively simple: the camera's shutter is manually opened until one of more lightning strikes occur within the camera's field of vision. The lightning itself acts as an electronic flash -- exposing itself or freezing the image onto the digital sensor or film. (An manual exposure setting of f8 for an ISO of 100 will work as a starting point under most conditions.)

The real trick is guessing where best to aim the camera, and how long to leave the shutter open. Pointing the camera where recent lightning strikes have occurred is the best wisdom, with adjustments based on the storm's speed and direction. Some photographers will shoot "wide" and crop in using Photoshop. (All of my lightning photos are uncropped.)

Time exposures can be often produce surprises (good and bad). The longer you leave the shutter open, the more lightning strikes appear in the image, usually making for a more dramatic image. And the movement of the clouds during a long exposure can produce some dreamy effects. However, leaving the shutter open too long can also wash out the details of clouds and surrounding landscape, especially if there are bright city lights or leftover twilight from a sunset (or impending dawn).

If all this seems too technical, don't worry, most point-and-shoot cameras will automatically set the aperture or "f-stop" and close the shutter when enough light has reached the camera's image sensor (just keep in mind that most P&S cameras cannot time expose longer than 30 seconds, so some of your options are limited). Consult your manual for time-exposure menu settings. (It should go without saying that all this requires a steady tripod.) For more technical information and tips on lightning photography, refer to this Matthew Cole page, this LightningBoy page, or Guy Tal's Mountain Trail Photo Blog.

You can also view my Flickr Photostream to see more of "My Vision."

Tuesday, June 16, 2009

Moonlight Reflecting Across the Ocean - My Vision

"Moonlight" across the ocean ~ © Royce Bair (Click image for a larger view)
This photograph was from the deck of a cruise ship, while cruising the Mexican Riviera in early December. I was teaching a photography workshop on this trip, and I took this shot in between classes. The idea in my mind was to create a romantic, moonlight evening view of the ocean, as one would see from the elevated deck of a cruise ship.

This shot is only an illusion to the nighttime. The image was taken in the daytime, with the sun just outside the camera view, so I had to shade the lens with my other hand. Photographing the reflection of real moonlight across the ocean would have required a time exposure that would have blurred the ocean waves to almost complete smoothness -- not to mention the fuzzy horizon line due to the ship's motion. This illusion is similar to how movie makers do "night" scenes -- underexposing the scene and using a blue filter, or changing the color balance in post-production. Note: in the early B/W days, a red filter was used, not to change color, but to increase contrast in the B/W image.

The original photograph was mainly shades of gray, with very little color. Post-production of the raw image in Photoshop changed the scene into millions of shades of blue. The sky also had to be darkened considerably. The final touch was to give the image a slight pinch-cushion distortion to increase the curvature of the ocean horizon. This less than 3% curvature has an amazing effect on the mind. The image becomes less static, more recognizable, more memorable, and more exciting.

I photographed some stunning locations on this trip, but this simple, conceptional icon has made more stock photo sales that any of the other images I took.

September 2012 update: A real moonlight shot is now possible with some of today's new high sensitivity DSLR cameras (full-frame sensors, capable of high ISO's and low noise), such as the Nikon D4s and the Canon EOS 5D Mark III. However, the results would still be very noisy. Let me explain: Daylight is about 300,000 times brighter than moonlight. The above daylight photo was taken at an exposure of f/18 @ 1/500 second, ISO 100. A similar moonlight shot would have had to have been taken at ISO 30,000,000! Since both of the cameras mentioned only go up to ISO 102400, I'd suggest a more reasonable exposure of f/1.8 @ 1/60 second at ISO 29,297 (or the camera's closest equivalent of 25,600) -- which would still be very noisy.

You can also view my Flickr Photostream to see more of "My Vision."

Friday, March 20, 2009

Your Photo Vision STATEMENT


Welcome to my blog! Whether you're a beginning photographer, intermediate, or a professional, the reason you take pictures is because you wish to share your photo vision -- your view of the world with others. In this blog I will talk about ways in which each of us, no matter our level of experience, can improve our methods of capturing our vision and sharing it with others.

I've been a professional photographer for over 30 years and I still enjoy learning new ways to capture the vision I have. I strive constantly to make my camera a seamless extension of my eyes. For most professionals and some intermediate photographers, this has been accomplished -- what we see on the LCD screen (and in our final digital images) is pretty close to what our eyes saw. We've finally mastered the technical part of photography.

But the most challenging step sometimes still eludes me, and that is trying to capture what my brain has envisioned -- trying to capture ideas and thoughts onto digital "film." Reaching this last level is the most fun. Some beginning and intermediate photographers want to go straight to this level without conquering the technical part. This leads to frustration and disappointment. At the same time, some intermediate and professional photographers can get so caught up in techique that their images are stilted and without soul.

As I have taught photography classes and workshops, it has often been an inspiration to me to see beginning photographers who have an amazing vision to share. Their images shout with expression and enthusiasm, even when their technical skills are somewhat lacking. Others, with more skills, produce flawless images, but they have nothing to say -- their pictures do not speak to you.

My goal in this blog is to 1) share my photo vision, 2) share the vision of others that I admire, 3) review products and teach skills that will improve your technique, and 4) share ideas that will increase the flow and enthusiasm for revealing your photo vision.

Add to Technorati Favorites